FLOR by heuga would normally recommend that you get a professional fitter to install your carpet tiles especially if you wish to create a special floor design. However if you are comfortable with DIY then it is possible to install tiles yourself and all the instructions are included in your box of carpet tiles.
Firstly I include the 'straightforward carpet tile installation instructions' as used by me then below I include the similar but slightly more complex version that is preferred by more technical DIY people. Maybe a combination of them both is best.
Straighforward carpet tile installation instructions:
1. Sub-floor
FLOR by heuga carpet tiles can be laid over any smooth, hard floor like parquet, laminate and stone. Ensure the surface is clean, level and dry.
2. Preparation
FLOR by heuga recommends that all carpet tiles are removed from the box and allowed to acclimatise for 24 hours to room temperature.
You will need:
A Stanley knife fitted with a new heavy duty blades
A metal straight edge, cutting board and tape measure
Double sided tape, carpet tape or spray adhesive (if a big area)
A marker pen
It makes sense to do some preparation in advance and place some tiles in position to check how it will look. This is especially important if you are combining different products and creating your own floor design. Also this will show if you have a thin strip of tiles at one end - if this is the case, work from the centre of the room to ensure equal sized tiles at each edge.
You may use double sided tape or a spray adhesive (if a very large room like an office) to attach tiles to the floor. If using a spray adhesive refer to the instructions on the container.
The arrows on the back of each carpet tile indicate the direction of the pile. When laying your carpet tiles you will need to refer to the catalogue or the packaging to ascertain the installation methods available for each product (monolithic, quarterturn, brick, ashlar and non directional - see catalogue for reference). If more than one method is available, select the installation method you want - try them out to see the different effects and then lay the tiles according to the arrows on the back of the tiles.
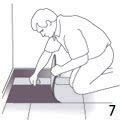
3. Cutting carpet tiles
 Use a sharp carpet knife and a metal straight edge to cut the tiles to the right size. Turn the tile with the backing facing upwards and cut it from the back. Crack the tile from behind and cut through the top fibre from behind.
When cutting tiles to fit at the wall turn the carpet tile upside down and set it flush with the wall and mark at both ends where the carpet tile overlaps the next tile. Then cut the tile using the straight edge.
When cutting tiles, make sure you mark the direction of the pile on the back of the cut tiles that lose the arrows. You could use your knife to draw an arrow on the back of the tile for example or use a marker pen.
4. Installation
Put the floor design together without fixing permanently to make sure you are happy with the design.
Place the tiles on the floor making sure you fit the tiles closely together. If using double sided tape you will only need to stick down occasional tiles and those on the edges to keep these in place.
5. Completion
Vacuum your floor and it’s ready!
You can easily update your floor design by replacing tiles as and when required or when you fancy a change.
More Complex Carpet tile installation instructions
Step 1 - Sub-floor
 FLOR by heuga carpet tiles can be laid over stone, ceramic or vinyl floors. Do not lay on a soft sub-floor such as existing carpet, underlay, cushion, vinyl or cork tiles.
Before laying, ensure that the floor is clean, hard, smooth, level and dry.
Step 2 - Tools and preparation
You will need:
A Stanley knife fitted with a new heavy duty blades
A straight edge, cutting board and tape measure
Pencil or chalk marker
FLOR by heuga recommends that all carpet tiles be removed from the box and allowed to acclimatise for 24 hours to room temperature.
The arrows on the back of each carpet tile indicate the direction of the pile. For ranges designed to be laid in a 'monolithic' or 'same direction' style, the tiles should be arranged with the arrows pointing in the same direction. However, other ranges can be installed in a variety of ways to achieve pattern effects (e.g. quarterturn, brick, ashlar or random - refer to catalogue or packaging to be sure). In these cases, you should always follow the instructions printed on the packaging.
 Step 3 - Measurement
Plan your floor installation by drawing a straight line approximately 75cm from the main wall and then draw a line at right angles to this. The lines must be straight and at right angles to each other.
 If you have an L-shaped room, you will need to subdivide the room into oblongs and for planning purposes, treat each oblong as a separate unit.
Step 4 - Trial run
It is best to carry out a trial run along both lines to ensure that the planning is correct. Lay the first tile into the right angle formed by the crossing lines, and continue to lay tiles along the main line up to the wall.

If you find that this leaves you with a very narrow strip against the wall, you may have to replan the guidelines.
Step 5 - Laying the first carpet tiles
 Once you have ensured that your initial laying point is suitable, fit the tiles along the first two lines, creating two crossed lines of tiles. To do this, attach adhesive tape in each corner of the tiles and stick each tile to the floor. Perimeter tiles must be anchored firmly. When laying carpet tiles install closley but be careful not to trap the pile between the edges of the tiles, particularly for shagpile or cut pile carpets.
Step 6 - Laying the main area
 Now cut the tiles in to the main wall and continue the tiling by building up a pyramid shape. Continue to expand the pyramid outwards until you are less than one tile width from each wall. Where necessary, adhesive tape to keep the tiles in position. Ensure that each tile is butted tightly against its neighbour.
Step 7 - Cutting the edge tiles 1
 You will have to cut the edge tiles to fit the space between the last row of full tiles and the wall. Turn the tile to be cut over, with the backing facing upwards and the arrows going in the opposite direction. Place the upside-down tile against the wall and underneath the last full tile of the installation. If cutting a tile you may need to draw arrows on the remainder of the tile with a marker pen to ensure you can still see the direction of the pile.
Step 8 - Cutting the edge tiles 2
 Using the edge of the full tile as a guide, draw a line across the tile to be cut. Remove the tile and score along the line with a Stanley knife and a straight edge. Then crack the tile from behind and cut through the top cloth. When cutting, always use a sharp blade and take precautions to cut safely.
Step 9 - Positioning the edge tiles
 Position the cut tile with the cut edge against the wall. Make sure that the arrow on the back is pointing in line with the installation direction instructions.
 Step 10 - Pile direction
 The arrows on the backs of the tiles indicate the pile direction. They must all point in the same direction to ensure a consistent finish. Please note that special care must be taken with other laying directions.
 The arrows on the backs of the tiles indicate the pile direction. They must all point in the same direction to ensure a consistent finish. Please note that special care must be taken with other laying directions.


+square+crop+72dpi.jpg)


No comments:
Post a Comment